

WP Booking System – A quick guide
This guide is a work in progress. Please check back or get in touch with us to discuss any scenarios that you might need help with
We’ll often use a plugin called WP Booking System to show calendar availability, and / or to control bookings on websites. If your website uses this functionality, please read through this guide to help you manage your bookings.
You can see the full online guide to the WP Booking system here: https://www.wpbookingsystem.com/documentation/ If you do not see some of the options, it is possible we will need to install add-ons. Note that this booking system can be as simple or as complex as you want it to be. I’ll always recommend starting simply, and building out from there if needed (eg adding online payments) at a later date.
What’s in this Guide?
A simple calendar and a stand alone booking form
One of the simplest ways to use the WP Booking plugin is to show an availability calendar and have a separate contact form for booking. In this scenario, when a new booking request comes through from the website you will manually have to add a booking to the calendar.
Manually Add a Booking to WP Booking System
- Log in to the admin area
- Select WP Booking System / Bookings from the admin menu
- Edit the required calendar and ‘edit calendar’#
From here you have a couple of options. If you have a booking form on your website, I would recommend using the ‘add booking’ button. If not, you can add the dates manually as below:
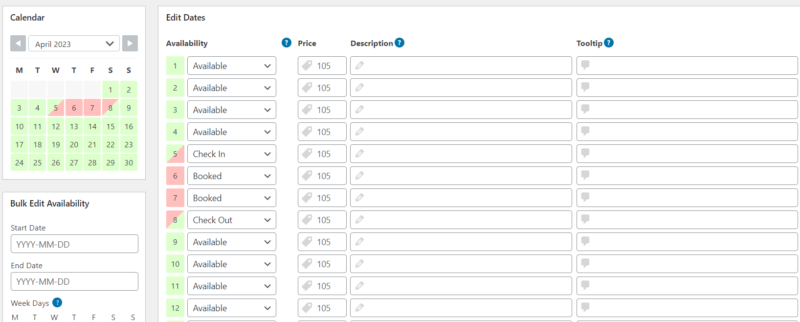
Add dates to calendar manually
Navigate to the start date of the booking and book the dates out. Note that changeover days will have a separate legend item (eg check-in)
Note that you can bulk edit the calendar by entering a start and end date and updating the legend. Once complete, scroll to the bottom and ‘Save Calendar’ so that the dates show as booked on the website.
This is a great overview, with videos of some of the basic calendar functionality: https://www.wpbookingsystem.com/features/calendars/
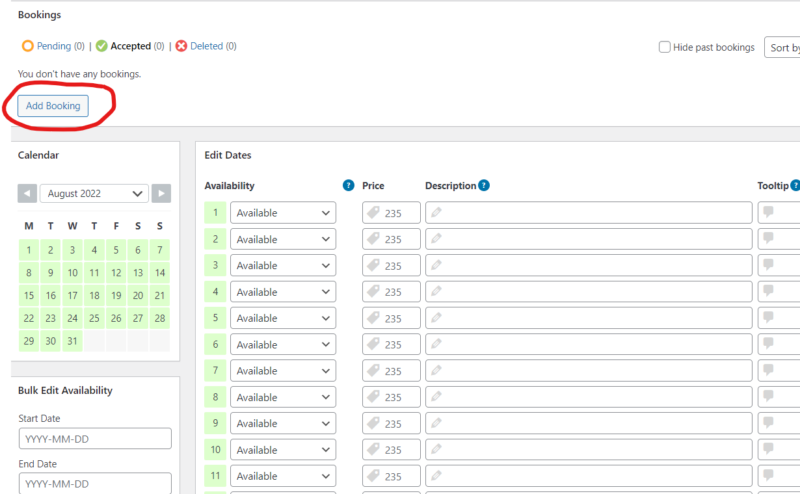
Add a booking manually using the form
In this case, open and edit the calendar as above, but this time click the ‘add booking’ button
This will bring up a copy of your booking form, where you can select the dates, choose to send the emails automatically, and add the booking with all relevant contact details.
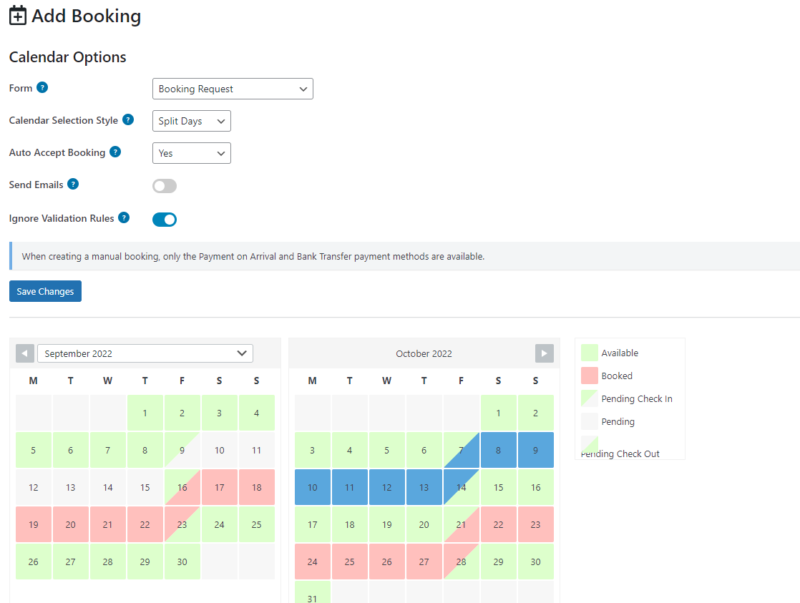
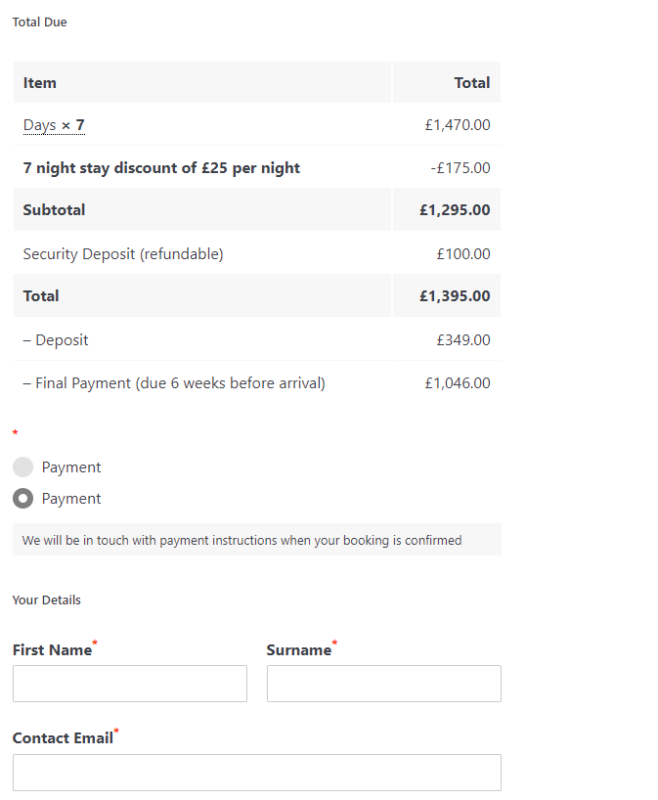
Then fill in the form and submit. Watch out for the payment option which may appear twice. Make sure you select the correct one – in this case the difference is seen on the Amount due breakdown – a deposit of 25% is due with one selection, whilst the other asks for full payment up front. This depends on the dates selected and the validation rules. Apart from that, everything works just like an online booking.
A calendar with a booking form
The booking calendar can also be linked to a booking form. This allows your customers to select dates from the calendar, and submit a booking form. Rules can be applied to the booking, such as mandating a specific changeover day, or specifying a minimum number of nights. This does also complicate things!
In this case you have 2 options available – when a customer submits a booking, you can auto-accept it, or you can process it manually. If you are managing multiple booking systems, I would recommend manual approval. This lets you check your other calendars and bookings first. You may also prefer to set a booking to pending, until a deposit payment is received to confirm the booking.
1. A booking is Submitted from the website
When a customer submits a booking, you will receive an email notification with the booking details. I’ll also configure the template email with a direct link to the booking manager area (you will need to be logged in to access this). It can be found in the left hand admin pane under WP Booking System / Bookings.
2. Manage the Booking in the Booking Manager
You can switch between list and calendar view in the top right corner of the booking manager. Depending on what view you choose, you’ll see something similar to one of the illustrations below:

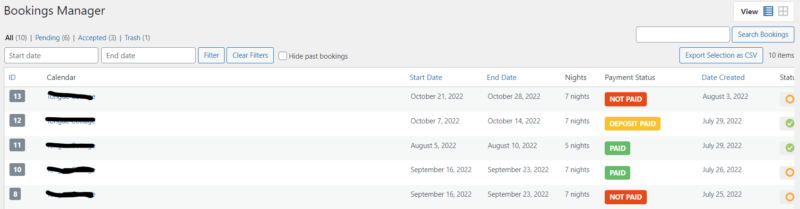
You can click on the booking ID to bring up the full details.
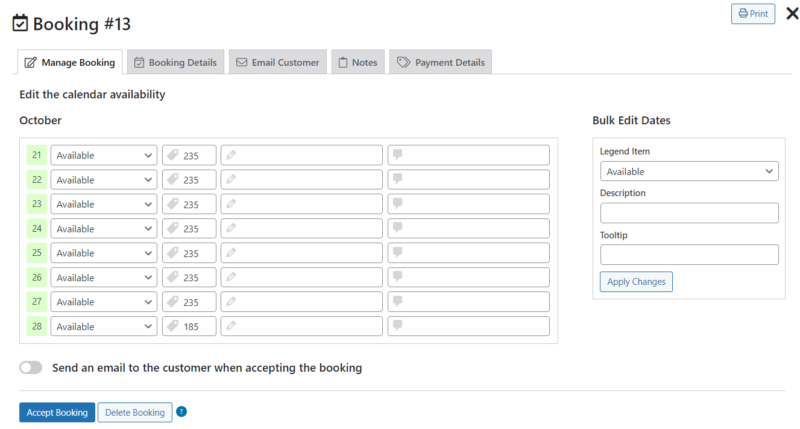
Update the dates to booked or pending, depending on your process. Note you can bulk update from the right hand panel and clicking ‘apply changes’. “Accept booking” will update the calendar.
The booking details tab includes all the booking information, and also, if applicable, when an email reminder will be sent – for instance for final payment x weeks in advance of the stay.
You can the select the ’email customer’ tab to send a tailored email, eg with payment details, to the customer. I will have set up some email templates for you to choose from in this scenario. You can also add notes, and mark the booking as part paid / fully paid:

High Level Process Overview
- Log into the booking manager and check that the dates requested are free. If you have calendars on other systems, now is the time to sync them – eg if Air BnB has just accepted a booking, it might not et be showing on the website.
- If the dates are free, set the booking to pending (if applicable) or booked. Some people prefer to accept payment before confirming a booking.
- Send an email to the customer informing them of how to pay (usually from the email tab in the booking).
- When payment is received, log back into the bookings manager and confirm the booking.
If you are operating part payments, you may need to repeat this process – eg a deposit up front to secure, then the remainder one month before the booking.
Remember to update the calendar legend and the booking when confirming or cancelling it!
Setting up or Amending Email Templates (Advanced)
If you want to create a new email template, or amend an existing one, you can do this from WP Booking System / Settings / Email. You can add various booking fields, such as Booking Reference, or name etc. Don’t upload a logo for your emails – they work better with the logo image embedded into the body. You can set up as many templates as you like, and these will then be available for you in the booking manager interface.
Reminder Emails and Follow Up Emails (Advanced)
To set reminder emails (eg a reminder that the final payment is due n days before the booking) go to WP Booking System / Forms and select the booking form you wish to add this to. Then choose the ‘Email Notifications’ tab. This is where the booking confirmation email is set. You can also set up a final payment reminder, to be sent n days before the booking, and a follow up email to be sent a set number of days after the booking has ended – to ask for a customer review, for instance.
Adding or Editing Booking Restrictions (Advanced)
If you want to add booking restrictions, such as a minimum number of nights stay, or limit check in to a specific day, you would do this from WP Booking System / Forms. Again select the booking form you wish to add the restrictions for, and go to the booking restrictions tab. There you will see something like this, which enforces a 3 night minimum stay and allows check-in on a Monday, Tuesday or Friday only. I will usually have set these up for you if required.

Adding Discounts (Advanced)
Go to WP Booking System / Discounts to add a new discount, or amend an existing one. Note that you can add charges to the booking rules here too by adding a negative discount.